
Common issues and installation errors in control systems – Part III
May 15, 2018 | By Mike Miller
As noted in Part I and Part II of this series (see HPAC February and March 2018), control systems are often blamed when something is not operating as expected. More often than not, if control systems do not perform as needed, something happened on the installation or programming side of things.
There is absolutely nothing that will minimize downtime and troubleshooting more than getting the system installed right the first time. Nothing will ever replace the need for solid training and acquiring an understanding of the product itself, along with the installation and troubleshooting side of things, in advance of working with the product.
Having discussed some challenges surrounding sensors in the first column and then controlled device sizing and piping requirements in the second, the focus here is on the controller’s outputs, the wiring of sensors, and control signals and communication. In addition, there will be a review of some basic setup requirements to be kept in mind when using multiple controllers that may not communicate with one another in a system.
OUTPUTS ON CONTROLLERS
When a controller indicates it is running an output, but the output does not seem to be responding, one of the following four issues may be the cause.
1. Bad internal controller relay: If the controller output is a dry contact, you can disconnect the wiring to the terminals and then use a meter with resistance option in ohms to verify the relay is indeed functioning by checking for resistance across the outputs. If the output is supposed to be on, the resistance should be 0 ohms (short circuit) when testing. Most commonly that is what you will find. Then you know the relay is good and you will need to investigate issues 2 and 3. If the resistance turns out to be infinite, then we know the relay is not made when it supposed to be. In this case call the manufacturer for further support, a product exchange or repair procedures. If the controller’s output is a powered output by either 24Vac or 120Vac, check for power with a voltage meter across the output terminal and the common or negative pole (-) of the transformer if 24Vac if low voltage or 120Vac to Neutral (N) if line voltage. Same as above, if voltage required is verified, the relay in the control is good and we will need to identify other reasons.
2. Not enough wire insulation removed: Sometimes not enough insulation was stripped off the wire entering the terminal block on the controller, preventing power or conductivity from being passed on to the actual device being controlled. This does not happen a lot, but I have seen it a few times. You will quickly identify that when removing the wire from the terminal and you see where the terminal screw pinched the insulation of the wiring. If that is the case, simply remove more insulation from the wire.
3. Wire between controller’s output and device is broken: Once we establish the control’s output terminal is working and it is reaching the wiring itself, look and see if something is worn within the wiring itself. Follow the same procedure as in 1 and check for resistance or power as explained earlier, right at the device itself. If you can still verify the conductivity, the problem very likely lies within the last option in this category.
4. Actual device is damaged or malfunctioning: Give the device one last test by eliminating everything else. Using short leads, power it directly, straight off a power source. If this still does not turn on the device, then it is likely requiring replacement. If it suddenly works the most likely case is something skipped or missed in the steps above.
WIRING OF SENSORS, CONTROL SIGNALS, COMMUNICATION
1. Wiring of sensors: We covered some potential challenges using sensors in the first part of this three-part series, but this is an important subject and calls for some pointers. First and foremost, read the manufacturer’s sensor wiring requirements. Some may want you to use shielded cable, most, however, are happy with twisted pair or low voltage thermostat (LVT) cable.
Always pay attention to the recommended American Wire Gauge (AWG) sizes and distances those sensors can be extended to. If shielded wiring is required, then connect only the two conductor wire to the sensor itself and trim back the shield layer to the wire insulation length. On the controller end of the wiring, terminate the 2 conductor wire to the appropriate sensor input terminals and terminal the shield layer to the ground terminal or common within the controller.
Sensor wiring should never run alongside any power-carrying wiring. It may cross power-carrying wiring, but again, it can never be tied to and run in parallel right next to power-carrying wiring as it may induce voltage or current and interfere with the accuracy of the sensors used.
2.Control signals: First identify what the control signal needs to be. The more common ones are dry contact enable or powered signals. Dry contact enable is just that–a wire and a switch. The switch could come from another controller or a thermostat for example. Powered signals are usually much of the same, except for here, power is introduced into the circuit. Some controller inputs must see power applied and some can range between 20Vac and 240Vac. Please always refer to the control manufacturers literature to be sure. 24Vac would be more common than not. To introduce power, look at the demand input as if it were a relay coil, your call for heat a switch and the power supply the source.
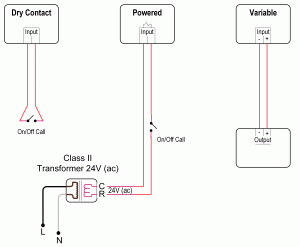
Figure 1 Signal wiring examples
Some other controllers require modulating control signals and those could include any of the variable voltage (0-10Vdc, 2-10Vdc) or variable current (0-20mA or 4-20mA) or resistive (0-135 ohm). Those are always polarity sensitive. Make sure you verify the polarity twice before terminating.
3. Communication: This is another very important detail to consider. Different controllers have different requirements. Some require a two wire connection that is polarity sensitive, where other two wire communication connections require no polar sensitivity. Again, always refer to the manufacturers wiring instructions. Where polarity is a requirement, the terminals will be clearly marked using their own label. Best practice would suggest that you should always use the same color code for the respective terminal throughout the entire control system to minimize the chance of error. Communication wiring is amongst the most critical to get right. Failure of getting this nailed down can cause hours or days of troubleshooting to find the culprit wiring in a system.
Some folks may call wiring stand-alone controllers together via enable switches, similar to the example given above for the “powered control signal” wiring, as “communication”, but those are nothing more than “enable” switches that switch power from one controller to an input on the next. In that example, the “On/Off Call” in the middle example in Figure 1 would be replaced by the enable terminals from the controller wanting to enable to next.
SETUP OF CONTROLS
In the final topic of this series, I address the importance of settings across multiple stand-alone controllers. Always make sure that one controller’s setting is not prohibiting the operation of another. Always understand what the system needs to accomplish.
When multiples are used, for example in systems with multiple mixed water temperatures, it is not uncommon to have two or maybe even more stand-alone mixing controllers with one main plant controller looking after the generation equipment. Making sure that those controllers are setup with respect to their controls needs is very important. For this example, the mixing controllers operate mixing devices for their respective system loops. The generation loop sensors are often monitoring the generation loop’s return temperature. It is therefore very critical to understand that the mixing controllers generation return temperature limits are adjusted to a different value than that of the generation equipment controllers loop limits.
As an example, in boiler plants the boiler controller could have a boiler minimum temperature limit programmed for 140F on the supply (if non-condensing boilers are used) while the mixing controllers minimum boiler return limits need to be set to 120F for the same example to avoid a scenario where the boiler plant is maintaining the minimum while the mixing controllers won’t allow operation of their mixing devices until their limits are satisfied. This is just one example, but one that I have come across too many times before that I felt it was worth mentioning here.
Another critical setting in some of the more complex communicating system controllers are schedules and scenes. Many building automation systems are not going to operate until a schedule is setup for it and the systems operation tied to it. In other words, unless a control look is applied to a schedule, it may sit there dormant waiting to be assigned.
In conclusion, this three part series provides pointers to help readers when working with control systems. You may come across other control system challenges, which could be the subjects of future articles. Let me know. <>
 Mike Miller is director of sales, commercial building services, Canada with Taco Inc. and a past chair of the Canadian Hydronics Council (CHC). He can be reached at hydronicsmike@tacocomfort.com.

