
Keep the Heat on with HVAC system checklist
December 18, 2017 | By Richard Boothman
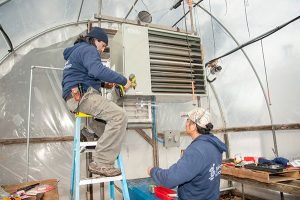
Ensure unit heaters, HVAC systems and other heating systems bring uninterrupted heat to your customers’ operations.
Winter can be hard on heaters of every type, but a step-by-step approach to preventive measures and maintenance of HVAC systems will help you to prepare for the harshest season of the year. From gas supply to air movers and condensate removal, the following list hits the preventive and maintenance high points on a range of heating products.
GENERAL MAINTENANCE
√ Check equipment for any physical damage that may have occurred over the summer. This should include damage to sheet metal, fans and air movers, wiring, gas pipes, vent systems, and equipment supports.
√ Look for cleanliness of heat exchanger and burners.
√ Check to make certain the vent system has not been compromised and is in the proper working order.
√ Check for obstructions that may be blocking the air inlet or discharge paths of the heat exchanger.
GAS SUPPLY
√ Check to make sure that gas mains are turned on.
√ Check inlet pressure and manifold gas pressure to heating equipment to make sure it is properly set.
√ Check gas regulators to be certain regulator vents are not plugged.
√ If propane is being used, check main regulator on tanks for proper pressure settings and check for damage to regulators.
√ Check propane tanks for proper size and liquid propane levels.
GAS CONTROLS
√ Inspect all gas connections for good tight fits.
√ This includes pipe connections to the equipment as well as pilot tubing connections at the gas valve and at the pilot burner.
√ Inspect the main burner gas orifices to make sure they are not blocked with spider webs. Check pilot orifice for obstructions if pilot cannot be lit or will not stay lit.
√ After visual and physical inspection of the gas connection, turn on the gas and check for gas leaks using a water/soap solution.
√ Do not check for gas leaks with an open flame. Check electrical connections to gas valve.
√ Check thermocouple, pilots, flame sensors, ignition cables, etc. for cleanliness and tightness of connections.
AIR MOVERS
√ Lubricate motor bearings if they are not the permanently lubricated type.
√ With the power turned off, check to see that the motor shaft turns freely and does not bind. This can be done by rotating the fan or blower wheel by hand.
√ Inspect the fan or blower wheel to make sure they are not damaged or binding.
√ Check to make certain fan is not loose on motor shaft. If blower units are used, make certain the blower and motor pulleys are secure.
√ On blower units, check for proper belt tension and also look for signs of belt wear.
√ Check power connections to motor to ensure they are secure and have not vibrated loose over the past heating seasons.
Note: Equipment using belt drives should have the belt tension checked on initial start-up. Periodic inspection should be made during the heating season to ensure continued proper operation.
CONDENSATE REMOVAL & DISPOSAL SYSTEMS
If the units are gas-fired condensing units, check the following items:
√ Make sure the condensate lines are clear of obstructions and free flowing.
√ Assure the condensate drain line “P” trap has been primed and filled with water.
√ Check the condensate overflow switch to make sure it is working properly.
√ If the unit(s) has been provided with a condensate removal pump, check to make sure the pump is working properly and has not been damaged.
THERMOSTATS
√ Check for general cleanliness.
√ Check wiring to and from thermostat.
√ Check thermostat for proper temperature setting.
GAS BURNERS
√ Inspect the burner for general cleanliness. If the burner requires cleaning, clean with a stiff brush (not a wire brush).
√ Inspect inside of burner tubes as much as possible. During the summer months it is not uncommon to find that spiders or mice have taken up residence inside the burner.
√ Inspect burner for proper location making sure that it is properly aligned and securely fastened.
VENT SYSTEMS
√ Check to make certain vent system is clear and free of any obstructions.
√ Be sure all connections are secure and tight.
√ Inspect the entire vent system for signs of corrosion, damage, and all potential issues that could lead to vent products entering the heated space or vent products recirculating into combustion air.
√ Clean vent pipe and clean out cap, if necessary.
START-UP
√ Make certain vent support system is secure and free of damage.
√ Check joints of vent for signs of condensate leakage. Water marks down the outside of the vent pipe may indicate inadequate venting and/or improper vent insulation in unheated spaces. If water marks are observed, double check to make certain the proper vent system has been installed.
√ If units are the power vented (power exhaust) type, check all the wiring connections to the power venter motor, and the vent system safety pressure switch. Also check the pressure switch sensing tube for blockage or damage. With the main gas turned off, cycle the thermostat to check the operation of the power vent, and verify the safety pressure switch is functioning.
√ Check the exterior components of the vent system (exterior vent extensions, vent weather caps, combustion air intake weather caps, etc.) to assure they have not been compromised, they are in proper position, and that there are not any blockages at the air intakes or vent discharges of the venting system.
Standing Pilot Systems – Turn off the power to the unit. Turn on the gas to the unit. Turn the gas valve control knob to the “pilot” position. With the gas valve control knob in the “pilot” position, manually depress the knob and light the pilot. After 30 seconds, release the control knob and assure the pilot remains lit. Next turn the gas valve control knob to the “On” position. Restore power to the unit and cycle the unit via the unit thermostat to assure it operates correctly.
Intermittent Pilot System – Turn off the power to the unit. Remove the wire lead from the “main valve” terminal of the gas valve and protect the wire to prevent shorting. Then turn the gas valve control knob to the “On” position. Turn on the gas to the unit and restore power. Cycle the unit via the thermostat and observe if a pilot flame has been established and if so, that it remains on. Next turn the thermostat down and observe if the pilot flame has been extinguished. After checking the electronic ignition pilot system functionality turn off the power to the unit and reconnect the wire lead to the “main valve” terminal of the gas valve. Restore power and again cycle the unit via the thermostat and observe that both pilot and main burner ignition occurs. After checking, reset the thermostat to the desired room temperature.
Direct-Spark Systems – Turn off the power and main gas to the unit. Remove the wire lead from the “main valve” terminal of the gas valve and protect the wire to prevent shorting. Then turn the gas valve control knob to the “On” position. Restore power to the unit, but do not restore the main gas. Cycle the unit via the thermostat and observe if the direct-ignition device is energized. (If the unit has a hot surface igniter a yellowish glow will appear in a few seconds. If the unit has a spark ignition type igniter, a sparking sound will be heard and a blue spark may be observed at the igniter). After proving the igniter function, restore the main gas to the unit and again cycle the unit via the thermostat and observe that both the main burner ignition system is functioning and that main burner ignition occurs. After checking, reset the thermostat to the desired room temperature.
On all units, observe the burner flame to ensure that it is burning clean and not wavering, rolling out, lifting or fluctuating. If an abnormal flame is observed, check the equipment installation and service manual.
RECORD KEEPING
It is recommended that a record be kept of the date the heating equipment was last checked and serviced.
Follow all instructions and cautions in the installation, operation and service manuals originally provided with the equipment.
Richard Boothman is director of North American sales for Modine. A printable blank inspection list is available at www.modinehvac.com (under maintenance).

