
Plastic Pipe Sizing
July 5, 2022 | By Logan Caswell
HPAC Magazine spoke with Lance MacNevin to break down the sizing challenges with plastic pressure piping for commercial applications.

This edition of 30 Mechanical Minutes featured a conversion between HPAC Editor, Doug Picklyk (left) and Lance MacNevin (right) from the Plastics Pipe Institute. MacNevin shared some history of plastic piping along with sizing tips for commercial applications.
On April 20th HPAC Magazine hosted the latest edition of 30 Mechanical Minutes, the free webinar series featuring virtual content for real world professionals.
This edition zeroed in on plastic pressure piping in commercial plumbing, with a focus on the growing adoption of plastic pipes and sizing issues when it comes to design for plumbing and heating applications.
The guest for this episode was Lance MacNevin, a frequent contributor to HPAC and the director of engineering with the building and construction division of the Plastics Pipe Institute. This edition was sponsored by IPEX.
History Lesson
To begin, MacNevin shared some background on the early history of plastic piping in the construction industry, which dates back to the 1950s.
The earliest residential installations of CPVC plumbing pipes was in 1959, and early-stage development of PEX piping was introduced in the1960s, with full-scale production hitting the European market in 1972 and really taking off in Canada in the 1990s residentially, and then in the 2000s for commercial applications.
Other materials like polypropylene and PE-RT piping were first developed in Europe in the 1980s and introduced in Canada in the 2000’s.
From a building code perspective, MacNevin shared that both CPVC and PEX have been in the Canadian National Building Code since the 1990s, and polypropylene was adopted in 1995, while PE-RT appears in the latest 2020 National Plumbing Code released this past March.
While most certified plastic pressure piping can be used for commercial systems, some materials are not available in the sizes required. For instance, PEX tubing is widely available in up to 2-in. diameter, while CPVC and polypropylene are made from ½-in. all the way up to 24-in. and 30-in. or even larger.
In the field, plumbers will typically choose CPVC or polypropylene (including PP-R and PP-RCT) piping for its rigid characteristics on straight run installations. An example would be the vertical risers in multi-story buildings and horizontal headers of a school or an apartment building or condo.
The logic is that you don’t need flexibility along a riser or header, but you do need big pipes and big volume. Then when it comes to branching off to individual classrooms, bathrooms, apartments or hotel rooms, the more flexible PEX or PE-RT are the choice of installation professionals.
MacNevin notes that all of the piping approved by the code has pressure rating for continuous operation of 100 psi at 180F giving plumbing installers the ability to seamlessly choose where they want to use rigid piping and where they want to use flexible pressure piping.
Sizing Plastic Piping
Clearing up some terminology, MacNevin then clarified sizing issues as tubing and pipe have dimensional differences worth explaining.
“We call it all piping, but there actually are dimensional differences between tubing and pipe,” he says, and this applies to plastics and copper and steel piping as well.
“Tubing” means the actual outside diameter (OD) is ⅛-in. larger than the nominal size, it’s also known as copper tube size (CTS).
“Pipe” means the actual OD matches that of iron/steel pipe of the same nominal size, iron pipe size (IPS). “So when people ask for a plastic pipe or plastic tubing they really should use the right wording to make sure they get what they’re hoping for.” He also adds that polypropylene generally follows the European metric dimensions.
When it comes to sizing piping correctly for plumbing and heating applications you need to know:
1) Required flow rate (GPM or l/min),
2) specific fluid type (water or perhaps a glycol mix for hydronics),
3) fluid temperature (which affects viscosity),
4) pipe type, inside diameter, and smoothness, and
5), pipe length and associated fittings.
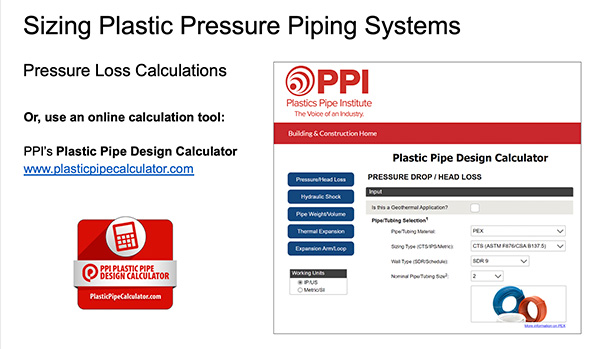
Lance MacNevin demonstrated a typical calculation using the PPI Plastic Pipe Design Calculator.
Since going with rules of thumb are not recommended, MacNevin shared how designers calculate pressure loss, velocity and the Reynolds number, an industry standard used to predict whether the liquid has a laminar or turbulent flow.
The classic equation that is used by the industry for pressure loss calculations is the Darcy Welsbach equation. The Plastics Pipe Institute has a free online tool, the Plastic Pipe Design Calculator (PlasticPipeCalculator.com) which can be used for calculating pressure drop and head loss among other options.
MacNevin provided viewers a concise walkthrough, demonstrating the ability to select piping and sizing type, wall types, and pipe diameter.
Additional parameters on the calculator include flow rate, pipe length, fluid type and average fluid temperature. Individual fittings can also be included, and then the online calculator does the work to reveal the resulting flow type (laminar or turbulent), pressure drop, head loss and velocity.
Pressure loss and velocity are the two main factors to be considered when sizing piping systems, says MacNevin. To reduce pumping costs and save energy, designers typically want to keep friction low, and they want to keep velocity down to mitigate noise and vibration.
And yet stagnation for potable water is always a concern so you want to keep the water moving. Oversizing piping systems can lead to cost over runs and increased installation costs. Using the calculator, designers can try out different piping scenarios to find the right fit.
The Reynolds Number
Also, for hydronic heating applications there is the very specific purpose of optimizing heat transfer through the wall of the pipe that’s located within a floor or encased in concrete outside in a snow and ice melt tubing system.
For these applications a minimum fluid velocity is important for optimal heat transfer to encourage a turbulent flow.
“You want the water moving fast enough so that it’s always mixing and you don’t get any slow-moving boundary layers of water inside the pipe wall (laminar flow).”
To predict the velocity profile and flow regime, the Reynolds Number is calculated to find that “just right” pipe size. As MacNevin explains, the process for pipe design and specification is iterative, with the benchmark Reynolds Number separating laminar flow and turbulent flow at around 2,300. Above 2,300, the Reynolds Number indicates turbulent flow regimes that will give decent heat transfer through the pipe wall.
There is also transitional flow, a rate between laminar and turbulent, but as MacNevin points out, with radiant heating in a floor for example, the 180-degree bends in the typical small diameter tubing encourage even more churning and turbulence to prevent laminar flow, and so most radiant and snow melt systems are getting good heat transfer, even if people didn’t design it that way.
Yet, taking the time to calculate the proper sizing and ensuring a turbulent flow will lead to better results.
“These are some of the factors that designers really should be thinking about when sizing pipes,” suggests MacNevin.
“It’s kind of like a Goldilocks situation, you don’t want too much and you don’t want too little, you have to find that middle ground and find the just-right perfect pipe. There’s always an optimal pipe size for a situation, but it might take a little work to get there.”
MacNevin also outlined how the Plastics Pipe Institute (PPI) offers a suite of tools for specifiers, designers, distributors, and installers, from training presentations and technical reports to case studies and more: visit www.plasticpipe.org/BuidingConstruction for more information.
View this entire episode of 30 Mechanical Minutes below:

