
Top ten heat pump start-up tips
September 1, 2017 | By Ian McTeer
It’s hard to stop a…” Admit it; I know you just filled in the blank. That’s OK, years of persistent marketing works wonders, but it does not mean other top brands aren’t capable of providing reliable service year after year. Most often, residential systems fail prematurely or under perform because:
They are not properly specified: guesswork, rules of thumb, “this is the way we’ve always done it”, such attitudes guarantee trouble.
They are not properly installed: Oh, you mean I can’t have 35 ft. of suction lift with this unit?
They are not properly commissioned: I thought the pressures were factory set!
They are not properly maintained: end user often believes no inputs from him are required or simply fails to maintain his equipment.
So many residential HVAC systems, presumably sold on the money saving energy efficiency bandwagon, have some or all of the above mentioned issues plaguing the homeowner.
Now that natural gas heating appears to have been given a very short shelf life thanks to climate change legislation, electric heating using existing and renewable sources of power generation will be the future. Heat pumps, utilizing electricity and the awesome power of the refrigeration effect, provide cooling and heating and can be operated with air handling systems or in hydronic applications.
TYPES OF HEAT PUMPS
Until recently, conventional heat pumps used residentially would be configured in two different ways: an add-on system or an all-electric system.
An add-on system consists of a vapour compression outdoor unit with a reversing valve coupled to an indoor coil installed on top (downstream) of a fossil-fueled furnace or electric furnace.
Add-on heat pumps can only operate until “balance point”, at which time the amount of heat lost by the building is greater than the amount of heat produced by the equipment. At that time, the heat pump must shut down and hand-off the heating job to the standby device.
All electric systems use a similar outdoor unit mated with a matching air handler typically containing enough electric heat strips to provide extra heat below balance point. All-electric systems typically allow the compressor to operate below balance point.
In my experience, most of the time, such heat pump systems were single zone, single stage machines.
Today’s heat pump choices are more easily tailored to specific applications and customer needs. The single stage heat pump is truly a thing of the past with technologies like geothermal, mini-split, multi-split and small duct high velocity inverter driven heat pump systems expanding into the conventional heat pump market.
Even conventional split system air source heat pumps offer similar compressor technology; some models feature two-step or multiple compressors while other units, promising even higher efficiencies, will utilize inverter compressors in five speed and variable flow configurations.
As yet another heating season is upon us, the best time to check the health of a heat pump system never seems to coincide with manufacturer’s recommendations. Any air source heat pump with fossil fueled back-up is going to require preventive maintenance on all the system components, best done at the same time. The problem is, testing the heating function of an air source unit on the hottest day of July could easily damage the compressor. The best time to perform a complete system analysis is late summer and fall when outdoor coil air entering temperature is more likely to be within chart values provided by the manufacturer.
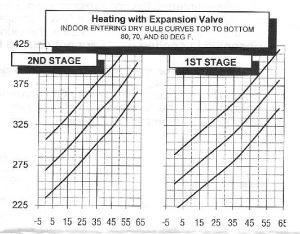
Figure 1 Head pressure chart
For example, the head pressure chart in Figure 1 shows the curve ending at an outdoor temperature of 63F (17C). Extrapolation of data beyond that point is not advisable as the unit may trip off on high pressure or compressor dome temperature or discharge line temperature thus negating test results.
PROPER INSTALLATION AND COMMISSIONING
How much time should you devote to PM work on a complete heat pump system, be it a geothermal product or an air source variable flow unit with a modulating gas furnace as backup? The sophistication of modern heat pumps means doing everything possible at start-up to reduce potential system malfunctions otherwise breakdowns or limp mode operation will plague the system and annoy the customer.
At commissioning, collect as much system data as possible to prevent intrusive inspections like checking gas pressure with a manifold gauge set every visit. Having the ability to check the charge without attaching gauges eliminates the possibility of POE oil contamination, introduction of non-condensable gases like air or nitrogen into the system and prevents the release of refrigerants that will affect system performance over time.
Top Ten Heating Season Start-up Tips
1. Interview the customer. Ask about unusual noises or poor performance issues such as having to revert to emergency heat. Did the customer ever receive training on how to use the equipment properly? How often does the homeowner maintain the system air filter?
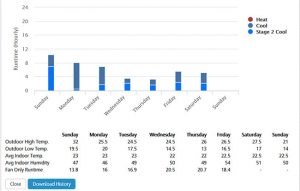
Figure 2 Cooling operation run time data
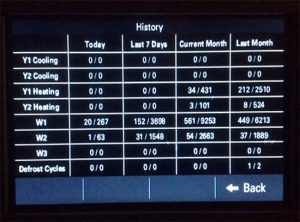
Figure 3
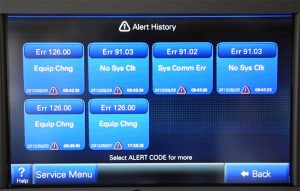
Figure 4
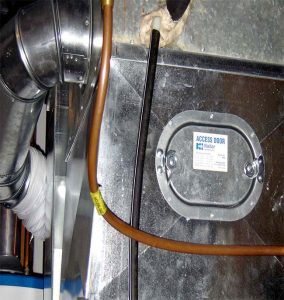
Figure 5
2. Before pulling out any tools, review any accumulated data from system devices: flash codes, thermostat run-time data, and thermostat fault codes. If it is an orphaned system, ask to see previous invoices or technician’s notes. Figure 2 is an example of cooling operation run-time data for one week. Figure 3 shows stored heating operation data provided by a communicating thermostat on a monthly basis. Note: data provided shows the number of cycles and the number of minutes of operation. Figure 4 is an example of stored fault codes. Such codes must be investigated even though the system seems to be operating normally.
3. Clean indoor heat exchangers and filters. The indoor coil, air handler blower wheel, and gas furnace secondary heat exchanger must be inspected for damage/leaks and cleaned if necessary. Indoor coils should be cleaned with a nonacidic coil cleaner and thoroughly rinsed. Clean the drain pan, trap and condensate pump at the same time. Figure 5 shows the use of an inspection door between the furnace and evaporator coil, a must for add-on conventional heat pump. Mini split indoor sections must be checked for cleanliness: tangential blower wheel, indoor coil, condensate drain and drain pan must be clean. Deep cleaning of the head may be required to guarantee an efficient heating season.
4. Visually inspect indoor electrical and mechanical components. With a bright flashlight and the unit disconnected from power, check low and high voltage connections. Look for loose spade connections, check that factory-made wire harness connections are solid and then look for pinched wires, improperly sized wire nuts, signs of overheating or water damage.

Figure 6
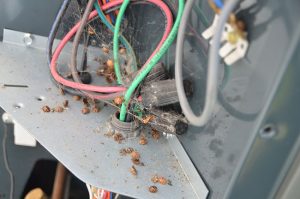
Figure 7
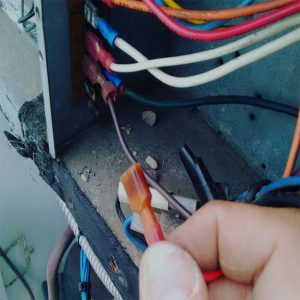
Figure 8
5. Clean the outdoor unit coil. After a summer in cooling mode, the outdoor coil may be covered in debris. Figure 6 is typical; this material must be removed before heating season. Remove all debris from inside the cabinet, especially leaves. Of course, geothermal installations do not require an outdoor unit making servicing indoors much easier.
6. Visually inspect outdoor electrical and mechanical components. With power off (remember, inverter drives need time to dissipate high energy, follow the manufacturer’s instructions for power down procedure), clean away bugs and debris inside the control compartment, Figure 7. Again, look for imminent signs of high and low voltage component failures, overheated connections caused by poorly made repairs (see Figure 8) and pinched wiring. Inspect control boards, run capacitor, starting relay and start capacitor for signs of failure (cracked plastic, swelling, water damage). Also look for copper tube rubs caused by improperly secured tubing, coil leaks, coil damage (straighten the damaged fins if possible) and be sure the base pan drain holes are free and clear so that melt water from the coil can drain away easily during defrost.
7. Start the system in heating TEST MODE. Once the vitals have been cleaned and checked, it is time to put the system into operation. Non-communicating older systems will have to be manually started at the thermostat by calling for enough heat to start the outdoor unit but to prevent second stage from calling. Systems equipped with Test Mode should be set to run the system at 100 per cent of capacity. All zone dampers should be open and the variable speed fan should run at its fully programmed heating speed. Test Mode typically lasts for one hour. Allow the system to operate for 15 minutes before collecting any data.
8. Check system vital signs. Ducted systems should be checked using original commissioning techniques. Depending on how the system was (or wasn’t) commissioned at startup, it might be necessary to invasively analyze the refrigeration system. Using smart tools technicians have access to accurate superheat and subcooling data without removing a hose full of liquid refrigerant or introducing system contaminants like moisture or non-condensable gases as often happens with traditional manifolds. Smart apps will also direct technicians to investigate problems related to air-side issues based on inappropriate refrigeration-side data. Malfunctions and poor performance problems must be corrected. An air-side heat pump compressor failure in the winter dooms the homeowner to run on backup heat until better conditions prevail.
Geothermal units should have the flow rate tested using a water pressure gauge installed into the appropriate PT port. Once the flow rate in gallons per minute has been established, a temperature probe should be used to determine the DeltaT between water entering and water leaving the unit. Ultimately, a geo unit’s heat of extraction/rejection (HE/HR) and the sensible heat (or sensible cooling) can be calculated using the collected data and manufacturer’s charts.
9. Check outdoor unit voltage, amperage and test critical functions. Compare the latest information with startup data or to the manufacturer’s chart. If the outdoor unit can safely operate in heating mode, test the defrost board by forcing a defrost cycle. Listen for the valve to shift smoothly. Observe the defrost board for fault indications. Since the CCH may be difficult to get at, ohming out the circuit may be the best way to prove its working.
Many inverter drive units have an outdoor communicating display assembly or a path to real time and stored system data that provides a technician with all the operational parameters needed to prevent invasive testing. Units so equipped can be easily tested and faults readily detected. The technician can force a defrost cycle; test the electronic expansion valve; even evaluate the inverter drive and outdoor fan functions using a laptop or built-in interface. Communicating units will allow the technician to adjust the indoor unit airflow and to amend blower delays from the outdoor unit as well.
10. Prepare a report for the customer showing the system functions within manufacturer’s specifications. Manufacturer’s charts typically have some leeway (head pressure, for example, may be within 10 psig +/- of chart values) and, as the system ages, the numbers will start to decline somewhat year over year. This is to be expected and helps the end user to understand when it is time for a new system perhaps avoiding the trauma of an emergency replacement generated by a nasty breakdown. Be sure the customer knows how to operate the system properly and religiously maintains the air filters in every air handler. It’s also a good time to replace the batteries in hand held remote controls.
Other than power outages, a properly installed, reliably maintained heat pump will soldier on regardless of winter’s worst extremes. George R.R. Martin, author of Game of Thrones, described the worst challenges of winter, “Everyone talks about snows forty foot deep, and how the ice wind comes howling out of the north, but the real enemy is the cold. It steals up on you quieter than Will, and at first you shiver and your teeth chatter and you stamp your feet and dream of mulled wine and nice hot fires. It burns, it does. Nothing burns like the cold…” May our heat pump installations keep our customers delightfully warm and comfortable.
Ian McTeer is an HVAC consultant with 35 years experience in the industry. He was most recently a field rep for Trane Canada DSO. McTeer is a refrigeration mechanic and Class 1 Gas technician.
For heat pump Pointers From The Field click here.

