
Common causes of refrigerant leaks and how to fix them
December 15, 2016 | By Dave Demma
I met with a supermarket chain recently and the subject of refrigerant leaks came up. This is not surprising given the fact that R22 prices continue to escalate as the supply continues to shrink.
I asked the director of facilities what he felt were the most common places they experienced refrigerant leaks and what they were doing to try to keep them to a minimum.
This particular chain has approximately 160 stores, ranging from less than a year old to ancient. To clarify, ancient to a supermarket is a store that has not seen a remodel for over 15 years. Given the range of ages, they have stores where some of the thermostatic expansion valves (TEVs) might include those with flare connections. These stores are in a separate category as the flare TEVs can be a major source of leaks. The best remedy for these is to replace the flare valves with ODF valves but it is probably not a practical remedy.
Flares and flare nuts
While most refrigeration original equipment manufacturers (OEMs) moved away from valves, sight glasses and filter-driers with flare connections years ago, they are quite common on mini/multi split systems and VRV/VRF systems. “Why,” you might ask? It is likely to ensure that the delicate, electronically operated step-motor valves are not overheated during installation. Yet, the dilemma is that they can have a tendency to leak. There can also be great variation in the quality of the flare joint, depending on who is making it and which tools they are using.
Why do they leak and how can those leaks be kept at a minimum?
Since the flare is typically hand-made in the field, without proper tools and a flare gauge, the results of the flare will likely vary from technician to technician. What might have been an inferior flare that still provided a leak free joint with the relatively low pressures seen with R134 may not stand a chance in an R410-A system.
Let’s look at some reasons for “bad” flare connections.
Flare too small
If the surface area of the flare is smaller than the corresponding mating surface, there will be insufficient area to support the necessary force generate
Undersized flare joint
d by the flare nut to provide a good seal. In addition, since this ineffective joint will likely become a leaking joint, the typical first attempt at repair might lead to over-tightening. While this might temporarily solve the leak, it may stress the “too small” flare surface, and cause it to fail in a large way in the future.
Some equipment manufacturers have a flare gauge available that sets the depth of the flare. This ensures a perfectly sized flare each time.
Flare too thin
A too thin flare occurs when the amount of tubing above the deck of the flare tool is insufficient to make a correctly-sized flare. Over flaring the insufficient amount of copper will allow the diameter of the flare to be acceptable, but will come at the expense of the flare’s thickness. The thinner flare joint can stress the copper, resulting in a weakened or cracked flare.
Using a flaring tool rated for R410A with a clutch will prevent over-tightening and the resulting flare thinning.
Ridge on the flare
Cutting a piece of copper tubing with a tube cutter (even one with a sharp cutting wheel) will leave a ridge on the inside of the tubing. A deburring tool must be used to remove the ridge otherwise the flare will have a ridge on it. Blade deburring tools will yield the best results, leaving a smooth surface inside the tubing.
Over-tightening
Since over-tightening is a somewhat subjective term, many OEMs utilizing flare connections have created torque specifications for their flare joints. Not only does this provide the minimum torque to ensure that the joint is leak free, it also provides the maximum torque, which will ensure that the joint is not damaged due to over-tightening.
On a new installation, leak checking with 550 psi dry nitrogen, along with good evacuation procedure, can verify that the flare joints are leak free.
Sealant on threads
Sealant on flare
First, it is always best to check with the equipment manufacturer to see what it recommends regarding the use of sealant on flare threads. Second, sealant has the potential to become “the problem” rather than a solution to the problem.
OTHER COMMON LEAK LOCATIONS
Some of the other more common leak locations experienced by the supermarket chain in question included the following:
Leaking and/or missing Schrader Caps
A Schrader valve is used as a means to temporarily access the system for pressure measurement, or perhaps system charging. Soap bubbles can easily verify if these valves are leaking or not. If they are leaking, obviously they should be replaced. Now, the cap is another matter. It is pure laziness that results in a “missing” cap. And, if the cap is missing, you can almost guarantee that it will become a leak at some point.
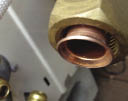
Missing TEV adjustment cap
While there is a seal between the TEV adjustment stem and the valve body, this is one of two seals that will prevent refrigerant from leaking out of the valve at this location. The second, the seal cap, is considered the final seal to ensure that the TEV does not experience an adjustment seal leak.
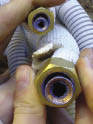
Tools are available to tighten seal packing in valve models with a stem packing. Notice the opposing notches in the threaded assembly around the adjustment stem shown below.
This can be tightened to eliminate leaks around the stem. A tool is required to fit into the notches and then turn clockwise.
Again, it is pure laziness if the seal cap is missing.
Leaking elastomer seals
(Neoprene O-Rings)
Seals will deteriorate over time, either due to age, heat or over-tightening. In addition, it was discovered during the early years of refrigerant conversions that elastomer seals (neoprene) will swell when in the presence of refrigerants. It turns out that they swell more in the presence of chlorinated refrigerants such as R22. So, an R22 to R407A conversion will result in elastomer seals shrinking (swelling less in the presence of R407A versus R22). Add that fact to the reality that seals in a system being converted might be in the six- to eight- to 10-year-old range.
In that case we are dealing with a seal that has taken a set between the bonnet nut and seating surface based on: how much the bonnet nut was tightened; how high the system pressure is that has been acting upon it; and due to its age, has likely hardened. Then the refrigerant is removed, eliminating the pressure against the seal. Then the new refrigerant is added to the system, resulting in seal shrinkage (less swelling). Is there no more perfect recipe for a leaking seal? This is why it is recommended that all elastomer seals be replaced during a refrigerant conversion.
And, for the final (and surprising) cause of leaks, we may have copper tubing where clamps had come loose and the system vibration has caused the tubing to rub against the strut and wear a hole in the tubing.
You could go a long way towards eliminating these types of leaks by periodic inspections of tubing clamps to make sure they are tight. In addition, using the cushion style clamps with rubber inserts to prevent the tubing from coming in contact with any other metal surface will all but eliminate these types of leaks.
As a good preventive measure against large refrigerant losses in larger systems, monthly leak checks can be instituted to catch leaks before they become cataclysmic. In addition, when leak checking a larger application such as a supermarket it is best to leak check the entire system even if a leak or two are found in the early stage of the leak check. There is no telling how much refrigerant has been lost because a technician finds a leak in a large system and assumes there is no need to complete the remainder of the leak check.
Dave Demma holds a degree in refrigeration engineering and worked as a journeyman refrigeration technician before moving into the manufacturing sector where he regularly trains contractor and engineering groups. He can be reached at ddemma@uri.com.

