
Refrigerant Leaks – What Are You Prepared To Do?
March 2, 2022 | By Dave Demma
Stemming losses of refrigerant in supermarkets requires a comprehensive end-to-end approach.

(source: Getty Images)
Refrigerant has become a rather expensive asset—one which should be protected. And data suggests the typical supermarket can expect to lose between 5% to 20% of its refrigerant charge annually.
Of course, there are many factors which will determine the amount of refrigerant charge lost in a given store: age, quality of the installation, whether the store has a PM (preventative maintenance) program, whether part of that PM program includes periodic leak checks, and when a leak is discovered does the technician continue to check the remainder of the system.
It should be clarified that those supermarkets at the lower 5% annual leak rate recognize the importance of that asset, and strive to protect it.
As stewards of this great world, equipment owners should be mindful of keeping refrigerant leaks to an absolute minimum. And from a financial standpoint, when refrigerant was less than $1/lb. there probably wasn’t quite the motivation, but given the increasing cost of refrigerants, this should be a great incentive to minimize leaks.
For example: a large supermarket with multi-compressor systems might contain as much as 4,000 lbs of refrigerant. Losing 20% equates to 800 lbs. If this happens to be an older store still using R-22, the replacement expense could be in the range of $40,000.
Add the labour and materials to repair the leak, and you’ve got a very large expense. With the slim margin made on groceries, a supermarket would need to sell a lot make that up.
The sad fact is that supermarkets can reduce their annual refrigerant leak rates, but don’t.
There’s no question that all mechanical systems are subject to failure the older they become. Below are a few ways older systems can develop a leak:
- Gaskets and seals can harden with age, resulting in leakage over time.
- The typical method of securing pipe, particularly in vertical risers, is with clamps. Older installations might have standard pipe clamps (instead of cushion clamps). Over time, especially with vibration and harmonics, clamps can loosen. This allows the copper pipe to begin rubbing against the metal strut, which will result in a wear spot and ultimately a leak.
- Pressure controls with copper capillary tubes can (and will) rub against something like a compressor body, another piece of pipe, framework, etc. Again, this will result in a leak.
- Condenser fan motors with bad bearings, or a deformed/broken fan blade, can cause enough vibration to weaken/destroy the motor’s mount, allowing the motor assembly to drop onto the condenser coil. These can result in serious leaks.
- A dirty condenser, combined with an extremely hot day, can result in discharge pressure that has elevated to the point where the high pressure relief valve opens, dumping some of the refrigerant charge.
- Poorly installed piping which results in cracks due to repeated stress over time can result in leaks.
- Technicians who make system adjustments and forget to reinstall service valve caps, manual stem caps, control valve caps, or Schrader caps, will result in leaks.
A monthly, quarterly, or bi-yearly PM program can go a long way to alleviating leaks. Many of the tasks performed during the PM, such as monitoring system operation, measuring system temperatures and pressures, checking control operation, cleaning condenser and evaporator coils, checking the condition of fan belts, contactors, and electrical connections are designed to keep the system operating at peak condition and reducing the probability of equipment failure.
Visual inspection is a valuable component of the PM, and has the potential to eliminate many causes of leaks.
- Spending time inspecting the equipment in the machine room, looking for evidence of oil seepage, can locate small leaks.
- Observing the compressor rack’s level of vibration/harmonics, and whether they seem to be causing excessive movement on small control capillaries, or smaller control tubing runs, can eliminate a potential leak.
- Inspecting the pipe clamping can reveal loose clamps.
- Inspect all valves to make sure the caps are installed and tightened.
- Keeping a log of the refrigerant level will reveal trends over time.
- Regardless of whether the system appears to be experiencing a leak, a periodic refrigerant leak check can/will reveal any leaks.
- On a multi-compressor rack system, or any large system with lengthy piping runs and multiple evaporators that has experienced a leak, it is imperative that once a leak has been located, it should NOT be assumed it is the only leak. The remainder of the system must be checked as well.
Several years ago I was asked to visit a few “trouble” jobsites at a major supermarket chain where the alleged trouble was leaking gaskets on control valves. As it was reported, these leaks were amounting to refrigerant losses in the hundreds of pounds per month and at multiple store locations.
I arrived at one of the stores in question, and met up with the technician. After briefly discussing the leak issues, he got his gear out and we went to work—right to the alleged leaking valve.
The technician was using his state-of-the-art electronic leak detector, which was capable of detecting a leak in the range of 0.5 oz/year. I might add, that a current state-of-the-art leak detector is now capable of detecting leaks in the .07 oz/year range.
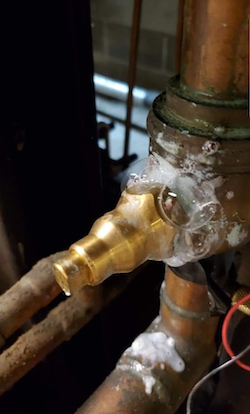
Using soap bubbles to pinpoint leaks. (photo: Dave Demma)
Within a matter of moments, the detector was making its alarming sound. I prefer a multifaceted approach to detecting leaks. Electronic detectors are great for pinpointing the area, and then verify those leaks with soap bubbles. This alleged several hundred lbs/month leaking valve generated about 1 bubble the size of a pin head approximately every minute.
This was definitely a false alarm. Even so, we replaced the gasket.
Now, why do I say false alarm? For perspective, with a leak rate of 0.5 oz/year it would take over three years to leak one pound of refrigerant. While today’s leak detectors can locate those miniscule leaks, they likely aren’t responsible for large repetitive refrigerant loss issues. Not to say that they shouldn’t be repaired, and smaller leaks can always become larger leaks, but this valve was clearly not the smoking gun we were looking for.
I asked the technician if he had leak checked the remainder of the system. He boldly proclaimed “No, I found my leak, so there was no need to continue leak checking.”
I then had the delicate task of telling the technician that he hadn’t properly done his job. Unless one is willing to perform a 100% complete leak check on the system, including the entire machine room, high side, low side, and all accessible piping he’s wasting his time, and doing a disservice to his customer.
Not only that, it can put a stain on the contractor’s reputation. How does he explain the charges for repairing a leak, and then come back the next week to add more refrigerant?
The fact is, leak detection on a large system is time consuming, and it’s horrendously boring. But it has to be done without losing determination or focus.
I politely asked the technician to indulge me, and leak check the remainder of the system. I left and let the technician do his job. I called the next day to learn what he had found. A bit sheepishly, he reported the following:
- One display case had an expansion valve leaking,
- One W/I box had a solenoid valve leaking,
- Several leaking Schrader valves,
- And the “piece de resistance” …a leaking pipe, the result of a loose clamp.
The grocery chain in question used the results of this experience to change their policy regarding leak detection. Their in-house technicians, along with outside contractors, were instructed that when a system was determined to be low on refrigerant charge, that the entire system must be fully and completely leak checked.
Now, what exactly is entailed in “fully and completely leak checking” a supermarket refrigeration system?
Leak Detection Methodology
- First, have at your disposal an assortment of good leak detectors. There are many brands to choose from. One popular detector now has the ability to display the PPM (parts per million) of refrigerant in the area allowing the technician to precisely determine which area of the store refrigerant might be emanating from.
- Have a working methodology for pinpointing a leak, once the general area has been located. My preference is to use soap bubbles. For example, if refrigerant is detected in the meat case lineup, and the left-hand meat display case shows the greatest PPM reading, you can be fairly certain this display case is where the leak is coming from. Using soap bubbles on all braze joints, valve connections and joints, Schrader valves, etc…will reveal which is leaking.
- In some instances, technicians might inject fluorescent dye into a system. It mixes with the refrigerant oil and travels around the system. The dye will leak out at any leak point and can be detected with a UV light. The plus side of dyes is they can help locate smaller leaks. The downside is it might take some time before the dye properly circulates and shows up as a leak. And some technicians don’t like the fact that the oil is now permanently endowed with dye.
Leak Detection Process
- Leak checking the multi-compressor rack in the machine is a task in and of itself. While there is no “typical” rack configuration, a five-compressor rack with 17 evaporator systems piped to it would not be out of the ordinary. Each evaporator system likely consists of multiple evaporators. Each compressor has several pressure control connections, an oil level control connected to the compressor body, but also includes a sight glass (both neoprene seals), a Schrader valve or two, suction and discharge service valves and maybe a suction filter-drier shell at the compressor inlet. The compressors are parallel piped to a common discharge header, which connects to an oil separator. The remainder of the oil system includes an oil reservoir, oil filter, access valves on the oil reservoir, oil pressure regulating valve, and oil piping to each compressor’s oil level control. The rack will have multiple pressure transducers, and one or more relief valves. Each evaporator circuit on the rack will have a liquid solenoid valve, liquid ball valve, suction regulator, suction ball valve, possible hot gas solenoid valve, and more Schrader valves. The main liquid supply will have a liquid filter-drier shell, receiver level gauge, receiver valves, possible subcooler circuit with TEVs and solenoid valves. There might be a heat reclaim valve, possible discharge/liquid pressure regulating valve for defrost and/or head pressure control, oh…and more Schrader valves, and a multitude of locations where piping is sitting on struts with clamps that should be tight, but may not be. And that’s just the machine room.
- Next is the condenser, along with the piping lines going to and from the condenser. It’s best to turn the system off and shut the condenser fans off so a leak detector can properly pick up any hint of refrigerant in the tube bundle, the return bends, access valves, etc. There might also be pressure controls in the condenser electrical panel for controlling fan motor operation. The high side might also include a heat reclaim coil or hot water reclaim tank. Follow the same procedure leak checking the heat reclaim coil as stated with the condenser. While it might not seem a high priority to check the piping, it’s not unheard of for a pipe to experience vibration induced stress cracks or wear due to a loosened clamp allowing the pipe to vibrate against the strut, wearing a hole in the pipe.
-
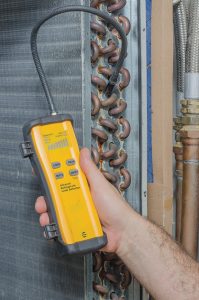
Use of an infrared refrigerant leak detector. (source: Getty Images)
Now, the low side of the system. This requires a trip to the display cases on the sales floor and various W/I boxes in each department. If it’s a gas defrost system, running the system through a defrost cycle will elevate the pressure and make leak detection easier. If not, then shut the entire system down and allow the low side pressure to rise to higher than operational levels. For display cases, running the electronic leak detector probe in the discharge air will sense any refrigerant that might be present. If this proves positive, then it becomes necessary to remove any product from the display case and inspect the TEV, check valves if a gas defrost system, solenoid valves (if present), and yes….Schrader valves for checking pressure to determine superheat. Using soap bubbles to check each valve joint, connection, etc. will help to precisely locate the leak. This procedure needs to be repeated for each display case and W/I box evaporator.
- If the store piping is routed underground, then it’s recommended to locate the point of penetration and “sniff” with a detector there too. While underground leaks aren’t the more common causes of refrigerant leaks, they are always a possibility. If an underground leak is suspected, the best way to prove/disprove a leak is to isolate the underground portion and pressurize it with nitrogen overnight. If the pressure remains the same, then there is no leak.
Interesting side note: one supermarket chain I visited surveyed where they experienced leaks in their stores. After tabulating data for over a year, they found the most common culprits were loose/missing Schrader valve caps and loose/missing TEV adjustment caps—all easily preventable.
Another chain I worked with, which had in-house service technicians, decided to implement a quarterly leak inspection in each store, and after a year they reduced their refrigerant consumption by a whopping 75%.
A final thought: we all know refrigerant leaks are expensive, and we all know refrigerant prices will continue to rise, and we are all aware of the environmental concerns regarding refrigerant leaks. And, finally, it has been proven that a PM program will result in drastically reducing refrigerant leaks. So, I ask this question, the same question asked by Sean Connery’s character Malone in the movie “The Untouchables” as he is dying after receiving multiple gunshot wounds from a tommy gun—he says to Elliot Ness (in reference to bringing Al Capone to justice), “What are you prepared to do?” <>
 Dave Demma holds a degree in refrigeration engineering and worked as a journeyman refrigeration technician before moving into the manufacturing sector where he regularly trains contractor and engineering groups. He can be reached at ddemma@uri.com.
